How to Do Advanced Yoga Poses . This comprehensive guide prepares beginners and intermediate yogis to safely attempt and master the latest viral yoga pose challenges (2024–2026). First, we list 8–10 trending poses, explaining each pose and why it’s popular on social media. Then for each pose we provide beginner-friendly, step-by-step instructions, common mistakes to avoid, safe modifications, progressions, contraindications, and an estimate of how long it typically takes to learn. We suggest visuals (photos, clips, diagrams) to illustrate each section and include captions. A detailed 6-week progressive training plan outlines weekly goals, daily sessions, and measurable milestones to build strength and flexibility for the challenge; suggested mermaid chart designs visualize the timeline and progression choices. The tutorial also covers essential safety: warm-ups, cool-downs, and injury-prevention tips. Finally, we give practical social media tips – captions, hashtags, filming advice, and accessibility captioning – to help make the challenge go viral. Tables compare the featured poses by difficulty, required strength/flexibility, and injury risk. All guidance is grounded in reputable yoga sources and sports medicine literature.
Thank you for reading this post, don't forget to subscribe!Trending Yoga Pose Challenge (2024–2026)
Social media challenges have made advanced yoga poses wildly popular. One recent viral challenge had people lying on their backs, grabbing one foot behind their head, and trying to lift the leg straight up – a deceptively simple-looking hamstring stretch. Poses like this become “viral” when a wide gap exists between how easy they look and how hard they are, leading to humorous fail videos. The 2024–2026 top trending poses (often seen on TikTok and Instagram) include:
- Reclined Hand-to-Big-Toe Pose (Supta Padangusthasana, Feet-Up Variation): A lying-down forward-leg stretch made famous by the “chokehold” yoga challenge. It’s viral because almost everyone struggles to straighten the lifted leg, creating funny reaction videos.
- Side Crow Pose (Parsva Bakasana): An advanced twisting arm-balance. It went viral for its visual drama and because many attempt it after seeing others do clever chair-to-crow transitions. Its deep twist makes striking “before/after” poses.
- Bird of Paradise (Svarga Dvijasana): A standing bound-leg balance. Its elegance and symmetry make for eye-catching photos. Often filmed in scenic locations or with flowing dance-like transitions, it’s popular for on-the-fly challenge clips.
- Peacock Pose (Mayurasana): A forearm arm-balance resembling a peacock standing on a stick. It’s been trending as a “strength challenge” because it looks cool and requires wrist and core strength; seeing someone balance like a peacock draws attention.
- Forearm Stand (Pincha Mayurasana) Variations: Inversions on the forearms, sometimes with leg splits or scorpion backbends, have trended as impressive feats of strength and flexibility. Many tutorials and challenges show beginners kicking up against a wall.
- Full Splits (Hanumanasana): The front split. Social media is full of “day 1 vs day 30” flexibility challenge clips. While not new, splits challenges remain popular for showing progress.
- Flying Splits Pose (Koundinyasana II): A twisting arm-balance with one leg forward and one back. Its name (“flying splits”) reflects its dramatic look. It’s often part of advanced arm-balance challenge routines.
- Scorpion Pose (Vrschikasana): A forearm-stand backbend with feet toward the head. It’s a crowd-pleaser because it’s very difficult and looks like a human scorpion. Many try this inspired by yoga competitions or circus-style trick videos.
Each viral pose on this list has amassed millions of views or likes in 2024–2026, inspiring fitness influencers and yoga novices to give them a try (often with comedic failures). Our guide now breaks down each pose in detail.
1. Pose-by-Pose Breakdown
Reclined Hand-to-Big-Toe Pose (Supta Padangusthasana Variation)
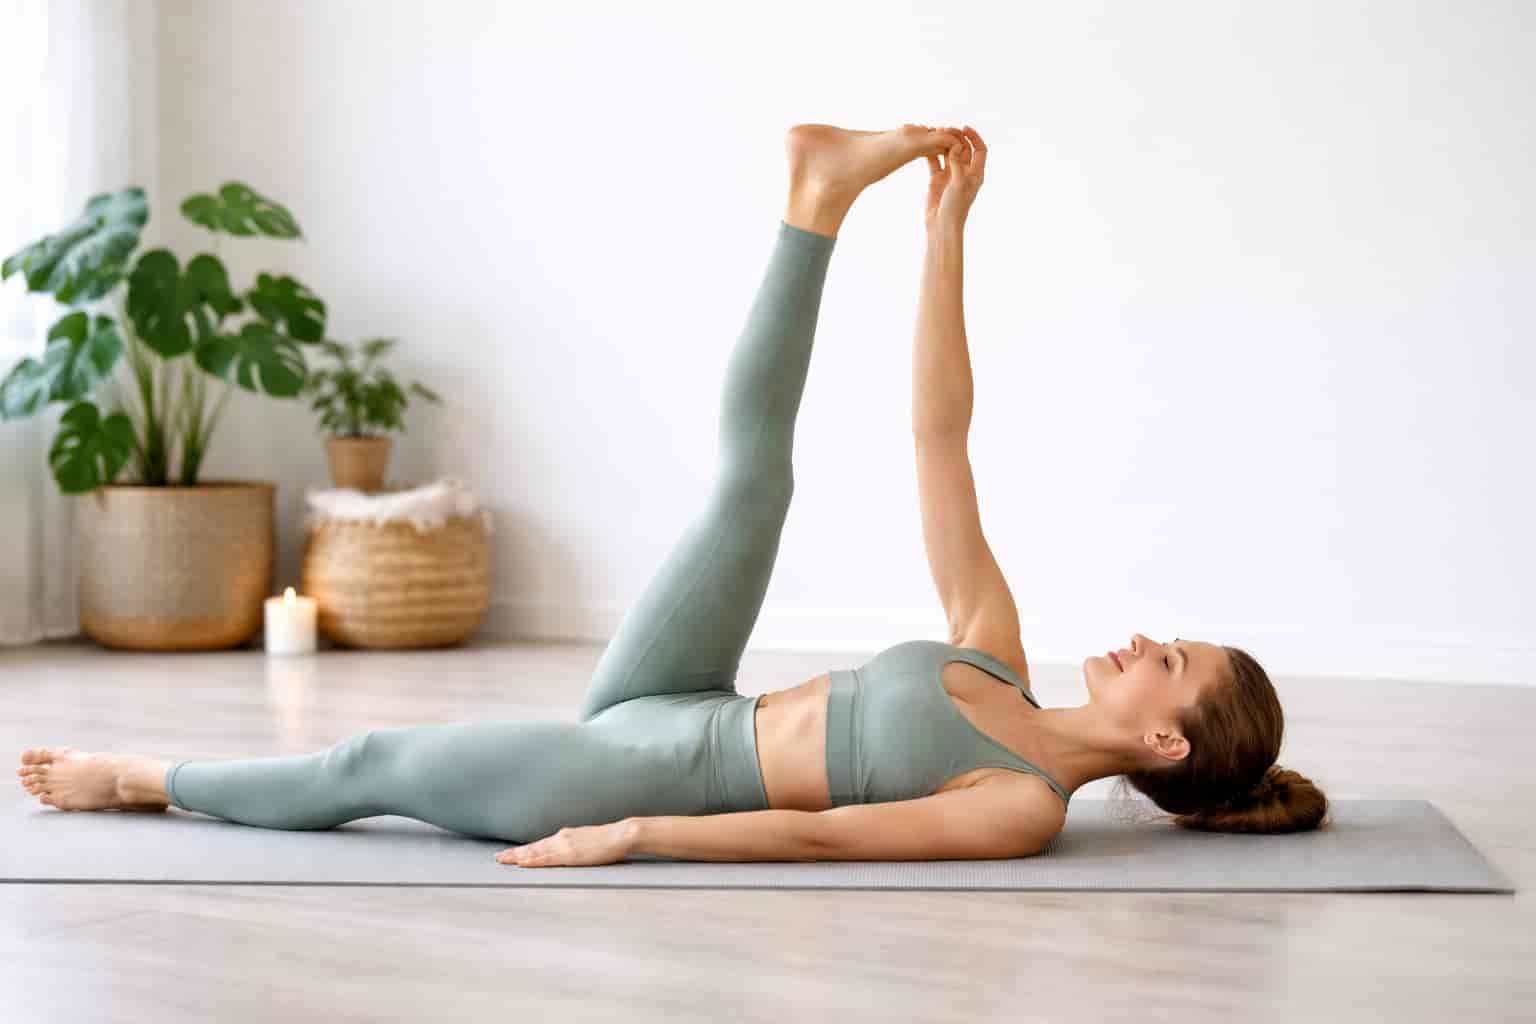
Description & Viral Appeal: In this supine pose, you lie on your back and grab one foot, trying to extend the leg straight up. The 2026 viral challenge had participants “convincing themselves they can do the pose” only to wobble and fall. It’s viral because it looks easy (just lift a leg) but requires exceptional hamstring flexibility. Spectators love the comical struggle.
Step-by-Step Instructions: Lie flat on your back. Bend your left knee and hold the left big toe with your thumb and first two fingers (the “yogi grip”). Inhale and straighten both legs simultaneously – the right leg stays on the floor, and you press your left heel up (start with knee bent if needed). Press your right hand into the right thigh to keep the bottom leg active. Exhale and engage your lower core (Mula Bandha). Lift your head and neck off the mat and use your hand to gently pull the left leg toward your face, aiming to bring the knee close to the chest. Keep both legs straight. Hold the stretch for several breaths (10 breaths is typical). Release with an inhale, and repeat on the other side.
Common Mistakes: Do not bend either knee, which shifts strain to the sitting bone tendons. Also avoid over-pulling: if the right (bottom) leg lifts off the floor, you’re pulling too hard or lacking hamstring flexibility. Keep the hips level on the ground; rocking the lifted leg out to one side often causes this. Mistakes include rounding the back or lifting the pelvis, which reduces the hamstring stretch and can strain the low back.
Safe Modifications: Use a strap if your hamstrings are tight. Loop a yoga belt around the lifted foot and hold both ends, allowing you to stretch without rounding the back. For deep relaxation or support, do the pose with the lifted leg against a doorway or wall – the wall supports the leg so you can relax. If you feel discomfort in your low back or pelvis, place a folded blanket under your hips to keep them neutral.
Progressions: Begin with a bent-knee variation (knees bent, pressing feet into wall). Gradually straighten the lifted leg more each session. Work up to removing props and holding the full extension comfortably. Integrate this pose into hamstring-opening sequences (like Down Dog or seated forward folds) to build flexibility.
Contraindications: Avoid if you have a severe hamstring strain or recent lower-back injury. People with detached retina or glaucoma should be cautious lifting the head. As with any intense hamstring stretch, proceed gently if you have sciatic pain.
Learning Timeline: Most beginners may need weeks to months to fully straighten the lifted leg. With 2–3 weeks of daily hamstring stretches (as in our 6-week plan), significant progress is typical, but full extension can take longer. Patience and consistency are key.
2. Side Crow Pose (Parsva Bakasana)
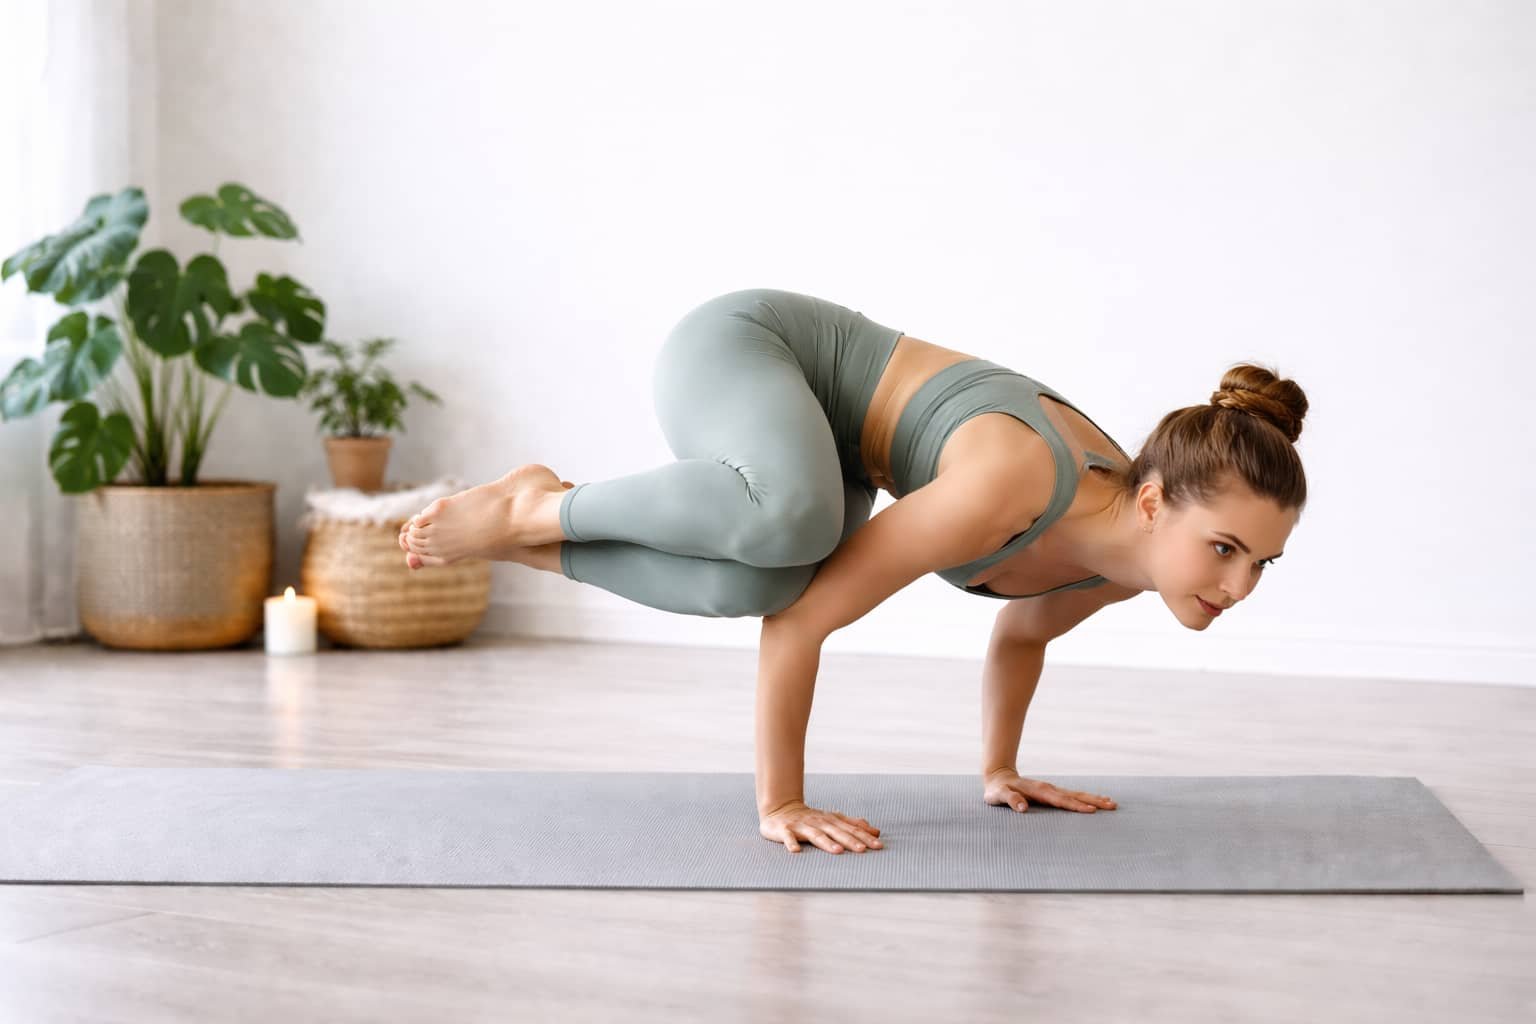
Description & Viral Appeal: This twisted arm-balance (also called Side Crane Pose) went viral for its dramatic look – it’s off-center and looks impressively difficult. It’s often featured in “get twisty” challenges. The pose builds core and arm strength, making it satisfying to achieve.
Steps: From a deep squat (Malasana), rotate the torso to the left. Place both palms flat on the floor outside the left foot. Lean forward and lift the hips as you bend your elbows into a 90° angle. Aim to have your left elbow under your left chest and your right elbow under your left knee – these become your support points. Shift your weight onto the hands and slowly lift both feet off the floor. Balance as long as comfortable, then return. Repeat on the other side. Key cues: Keep knees together, core engaged, and gaze forward to help balance.
Common Mistakes: A frequent error is not twisting deeply enough; the twist must be “locked in” so the upper arm can support the knee. Another is collapsing the spine or rounding the shoulders. To balance, avoid leaning too far forward or backward. Also don’t let the elbows flare; they should point backward under the body. If the feet won’t lift, check that your gaze is forward and core is tight.
Modifications: To build up, practice with the back knee still on the ground (Level 1 version on Tummee), or use one block under the side of the torso to partly support your hip. You can also bend the elbows more or keep toes on floor. Using two stacked blocks under the side of the ribcage can help you learn to twist into position before lifting off fully.
Progressions: Before Side Crow, master Crow Pose (Bakasana) and Crane Pose (Bakasana with straight arms) to develop shoulder stability. Work on twisting poses like Revolved Chair (Parivrtta Utkatasana) and Garlands with twists to open the torso. A natural progression is to practice “Twisted Crow” (knees slightly off-center) and then fully turn as you get stronger.
Contraindications: Avoid if you have wrist, elbow, or shoulder injuries. Also skip it during pregnancy or if you have high blood pressure or a hernia (strong twists can compress the belly). Do not attempt without warming up the wrists and shoulders thoroughly.
Learning Timeline: As an advanced arm-balance, it can take several months to lock in this twist and strength. With regular practice (e.g. 2–3 times/week of preparatory exercises), beginners often see progress in 6–12 weeks. Consistent arm and core training (Planks, Chaturanga) accelerate success.
3. Bird of Paradise (Svarga Dvijasana)
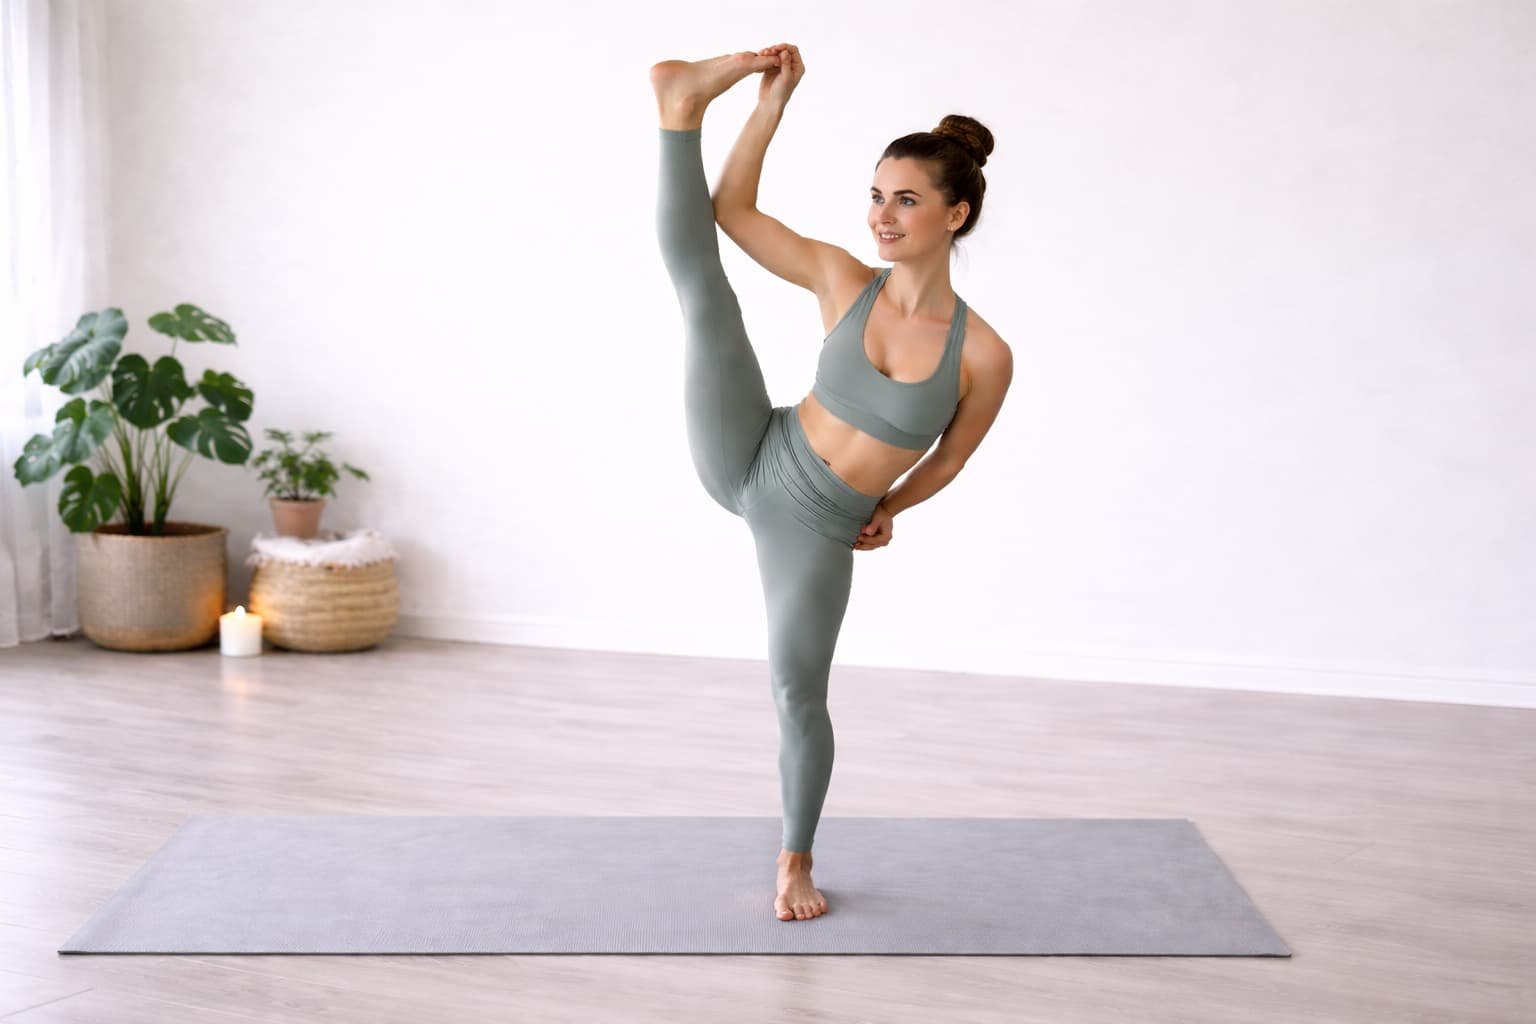
Description & Viral Appeal: A standing one-legged bind where the free leg is held straight overhead. It looks very elegant and symmetrical, making it a social-media favorite. Videos often show creative ways to hook the leg into position. Its beauty and difficulty make it trending content for flexibility challenges.
Steps: From standing, sweep your right arm between your legs and wrap it around your right thigh (like in bound Half Lotus or a twisted forward fold). Clasp your left wrist behind your back (they will probably not reach, so use a strap or hold onto clothing at first). Square the hips forward. Inhale, bend your left knee and lift the right leg off the ground. Slowly straighten both legs to stand tall, keeping hips level. Your right foot will press up and out to the side as you find balance. Keep shoulders down, chest lifted. If you can’t straighten fully, stop where you feel a strong stretch and hold there, or practice with the back knee slightly bent (Half Bird). Repeat on the other side.
Common Mistakes: Twisting hips (open hips) is a common mistake. To maximize stretch and balance, keep hips square and facing forward. Also avoid arching the lower back; core engagement is key. It’s easy to drop the extended leg or lose hip alignment. Use a mirror or friend to check that your standing hip doesn’t jut out to the side.
Modifications: Use a strap between your hands if your wrists won’t clasp. Alternatively, keep the back knee on the ground and work on lifting the front leg gradually. Another mod: try it seated on one leg (supported by a block under the buttocks) to get the bound leg position without balancing, then transition to standing.
Progressions: Begin with Standing Figure-Four or Vrksasana (Tree Pose) to build balance. Practice Dancer’s Pose (Natarajasana) for a similar hip stretch and backbend. Partial binds help: use a block between thighs to simulate the leg overhead before going all the way.
Contraindications: Avoid if you have hip, knee or shoulder injuries, as the pose deeply stretches the hip of the lifted leg and requires shoulder mobility. People with sciatica should take care.
Learning Timeline: This advanced balance may take months of practice. With the right prep (hip openers, leg stretches, core work), many intermediate yogis can achieve it in 3–6 months. Focus first on flexibility and bound standing poses before attempting the full Bird.
4. Peacock Pose (Mayurasana)

Description & Viral Appeal: In Peacock Pose, the body balances horizontally on straight arms like a stiff plank. It became a viral “challenge pose” because it looks thrilling and requires whole-body strength. Social media clips often show progressions or humorous attempts. It’s also known as a “plank on a toothpick” for how scary it can be.
Steps: Sit on your knees and come to all fours. Turn the fingertips toward your body and place your palms on the floor as close to the groin as possible. Or, if that rotation hurts, turn palms outward or fingertips forward. Tuck the toes under so the tops of the feet touch. Slide hands closer to the groin and work to get the elbows tucked under the belly button level. Once your elbows can come as far forward as possible, press the pinky edges of hands and inner elbows together. Slowly walk feet backward into a forearm plank position, so your triceps and elbows are stacked (this is like Dolphin Pose with elbows down). Keep shoulders away from ears and gaze forward. To lift up, concentrate on leaning forward without bending the arms – the action is to roll the body forward like a wheel. Push with the balls of the toes to raise the chest, and once the feet lift off, extend legs fully. Squeeze thighs together and widen the collarbones. Hold briefly with deep breaths, then exhale down.
Common Mistakes: The biggest mistake is not tucking elbows low enough. If elbows are above the navel, you cannot lift; aim to get them below the waist. Another is hyperextending or locking the arms in the attempt to lift. Also avoid collapsing the torso; keep it straight like a table. People often try to “pick up” with the legs, but actual lift is a forward roll, so watch for that.
Modifications: Start with knees down: practice putting elbows together in Vajrasana or kneeling plank, then lean forward slightly to get used to weight on forearms. Build arm strength with Dolphin poses. Place a blanket under your forehead or keep the feet lightly touching the wall at first to catch a fall. Over time practice shifting more weight forward gradually.
Progressions: Work on strong plank and Chaturanga. Build wrist strength with wrist push-ups and balance on fists if rotations hurt. Once you can lift knees off ground (advanced dolphin), attempt lifting one foot at a time before both.
Contraindications: Skip if you have any wrist, elbow or shoulder injuries, or recently injured belly or chest. If you have high blood pressure, hernia, or early pregnancy, avoid the deep abdominal compression. As always, warm up the entire body, especially shoulders and core.
Learning Timeline: This is very challenging – expect months of practice. Consistent core and arm training can allow some to achieve a few inches off the ground in 6–8 weeks, but full lift often takes 3–6 months for most practitioners.
5. Forearm Stand (Pincha Mayurasana)
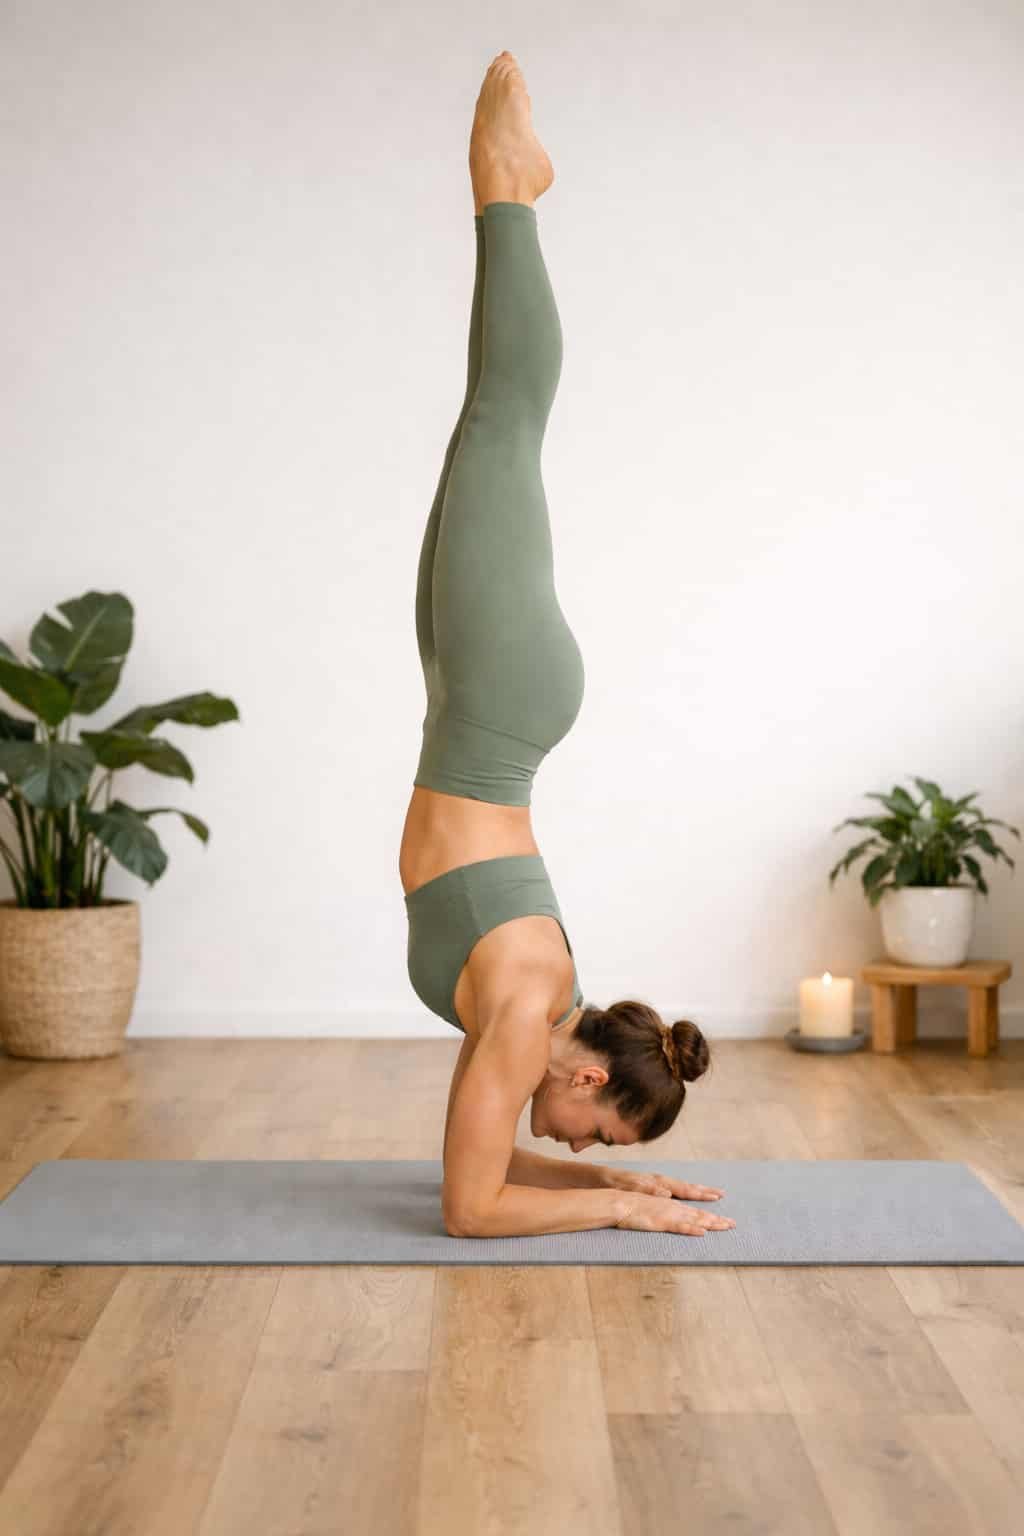
Description & Viral Appeal: Forearm Stand is an inversion balancing on the forearms. It’s viral because it showcases strength and balance; many TikTok tutorials and fails feature kicking up into Pincha. Wall-supported forearm stands and “leg split up” variations are trendy, and mastering it feels like a rite of passage.
Steps: Begin in Dolphin Pose (forearms on floor, shoulders over elbows). Walk feet in toward hands, just as in Downward Dog on forearms. Press shoulders down into forearms and lift hips high. Look between the forearms. Keeping one leg straight, inhale to kick it upward behind you. Push strongly through that leg’s inner heel and core to lift the hips. The second leg follows up. Aim to bring hips over shoulders (center of gravity stacking). Once up, flex both feet and reach legs actively upwards. Keep legs together (or in a controlled split) with quads engaged. Hold balance with soft gaze, then gently lower one leg at a time.
Common Mistakes: Arching the back or letting hips sag is common; strive for “tabletop over shoulders.” Avoid flaring elbows – they should stay shoulder-width and straight. Another mistake is kicking up too hard and falling backward; use controlled momentum (often using the wall first). Make sure to keep shoulders pushed away from ears to avoid elbow strain.
Modifications: Practice with heels against a wall. Step one foot up into a wall Handstand first. Use wall-supported Dolphin to build shoulder flexibility. Keep one heel on wall as you practice kicking up the other leg. Build shoulder strength with Planks and Pike Push-ups.
Contraindications: Avoid if you have shoulder, neck, or back injuries. Do not attempt without warming up and without a spotter or wall if you’re new. People with high blood pressure or glaucoma should take caution in any inversion. Always breathe evenly.
Learning Timeline: Learning a stable forearm stand typically takes weeks to a few months. With focused shoulder opening and core work 3–4 times per week, many practitioners can hold a wall-supported Pincha in 4–6 weeks. Balancing free-standing may come later, as falling safely takes practice.
6. Full Splits (Hanumanasana)

Description & Viral Appeal: The full front split (Hanumanasana) is a classic test of flexibility. “Full splits challenge” videos remain popular, showing progress of hamstring lengthening. This has been trending because it’s visually clear when someone improves flexibility, and it’s relatable (many people aim to do the splits in fitness).
Steps: Start in a low lunge with right foot forward and left knee on ground. Ensure hips squarely face forward. Inhale and walk the right foot forward, straightening the right knee while sliding the left knee backward. Keep hands on the floor for support. Slide hands forward to help lower the right leg; control your descent with engaged legs. Continue until you feel a deep but safe stretch in front of left hip and back of right thigh. If comfortable, release hands from floor and lift the torso upright. Once down, flex the front foot and keep back leg active. Remain in the split for several breaths. To exit, slide the front foot back under you, coming up to a kneeling or lunge position. Repeat on left side.
Common Mistakes: Avoid allowing the hips to rotate out. Both hip points should face forward (a “closed-hip split”). A mistake is lifting the front heel too high or dropping the back knee – aim for a level floor on both knees (or forefoot/back of knee). Don’t hyperarch the lower back; keep the pelvis neutral. If you feel knee pain, stop – the split should stretch the thigh and hip, not strain the knee.
Modifications: Use blocks under your hands (Step 5 in Liforme) to raise the floor to you. Place a blanket under the back knee to cushion. Props under the front thigh or calf can support your weight as you gradually deepen. Work with Half Split (Ardha Hanumanasana) by only lowering until your body is comfortable; that’s still great hamstring work. Holding onto a wall or railing for balance while sliding can help steady.
Progressions: Improve hip flexibility with lunges (Anjaneyasana), Pigeon (Eka Pada Rajakapotasana), and wide-leg forward bends. Practice intermediate splits (half splits) daily, sliding a bit farther each week. Slowly lower only a little each session; consistency is key.
Contraindications: Skip if you have knee or hamstring injuries. Careful with hip or groin pain – approach with gentleness. People with serious knee problems should avoid forcing this deep leg separation.
Learning Timeline: Flexibility gains take time. A dedicated practitioner doing 3–5 splits stretches per week may see noticeable progress in 4–6 weeks, but achieving flat ground takes longer. Many say true splits can take 2–3 months (or more) of consistent effort. The key is gradual, pain-free stretching.
7. Flying Splits Pose (Eka Pada Koundinyasana II)
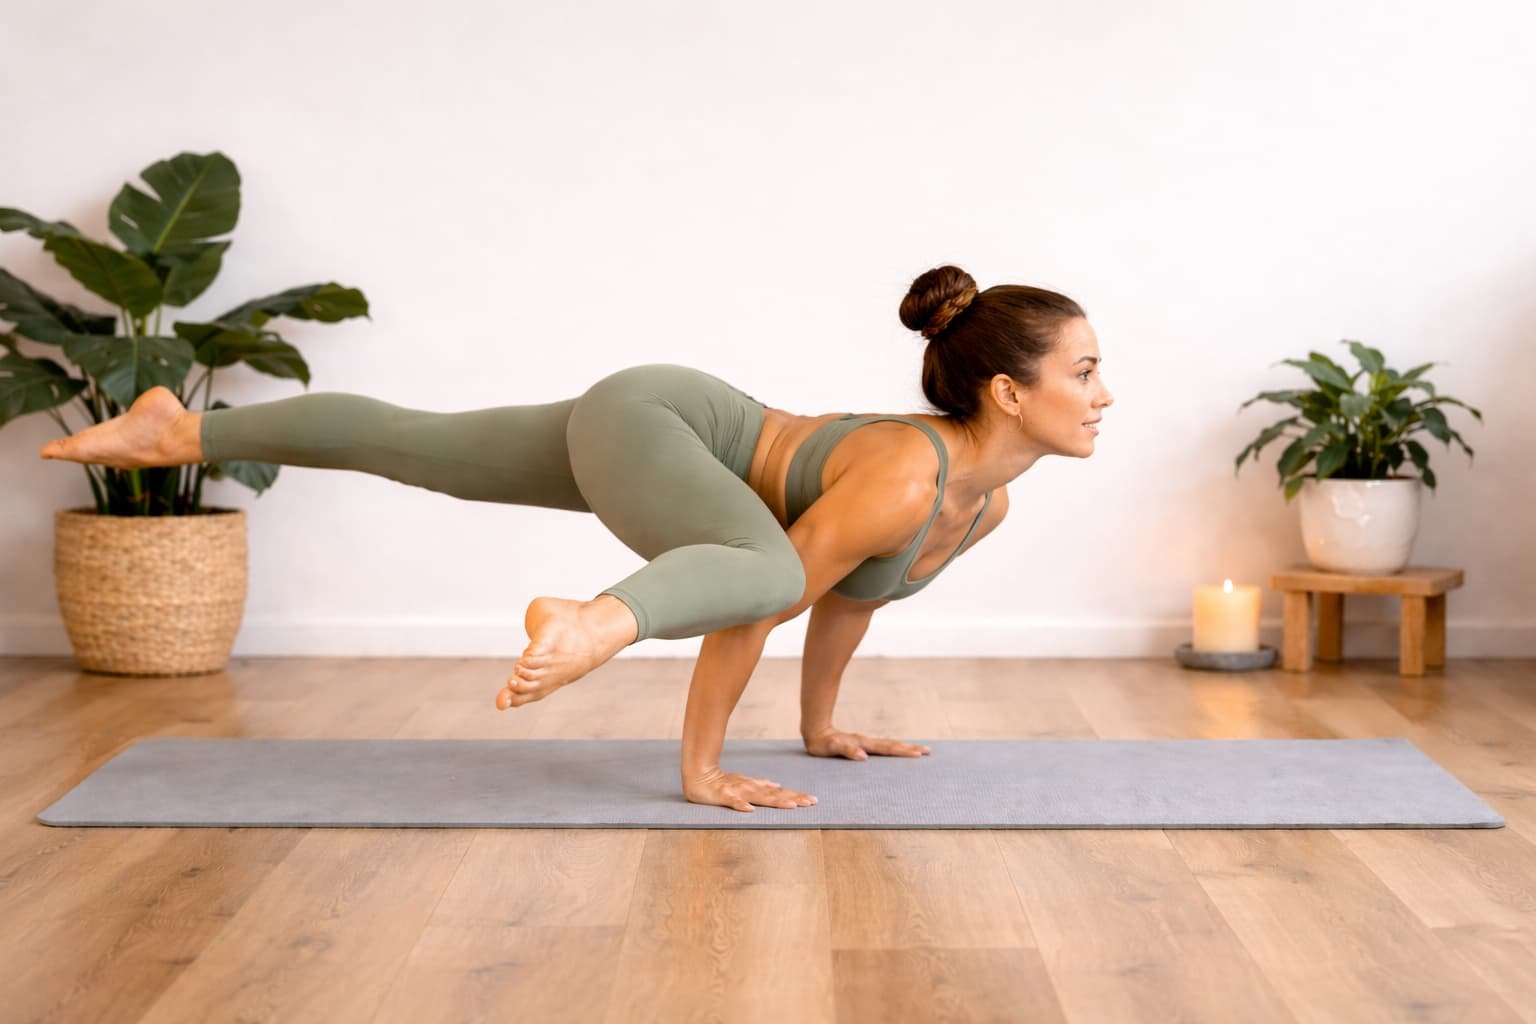
Description & Viral Appeal: Called “Flying Splits,” this advanced arm balance has one leg forward and one back, both extended while balancing on the arms. It’s popular in arm-balance challenge series due to its dramatic twist and strength requirements. Many have attempted it in “arm balance week” or flow challenges.
Steps: From a tabletop or L-shaped position, windmill the right leg under the torso and place the right hand near the right hip. Slide right elbow under the abdomen if possible. Lean forward onto the right forearm and place the left hand on floor for balance. One by one, straighten the right leg back behind you (lifting toes off ground) and extend the left leg forward in front of you, parallel to the floor. The arms bear most of your weight. Keep the body low and parallel to the floor. Focus gaze forward to help balance. Slowly lower and switch sides. (A preparatory version is Koundinyasana I with bent back leg.)
Common Mistakes: Twisting the torso is essential; without it, hips will sag. People often fail to rotate the extended leg enough. A crooked spine or one leg dragging is a sign to back off. Another mistake is putting too much weight on one arm. Engage the core strongly to support. Use control – don’t kick out too fast or you may flip.
Modifications: Practice the twist without lifting (keep one knee bent on the arm as in Eka Pada Koundinyasana I). Use blocks or a wall to support the front leg at first. Work on core strength (Boat Pose, Plank variations) and basic arm balances. Gradual approach: first master one side (with back knee down) before trying full extension.
Progressions: Before Flying Splits, be comfortable with Ardha Koundinyasana (half splits pose), Lizard Pose, and advanced chaturangas. Building wrist and shoulder strength via Crow and tripod headstands will help.
Contraindications: Avoid if you have any wrist, elbow, shoulder, or hip injuries, as this pose stresses all those. Also not suitable for pregnancy or during menstruation due to deep abdominal engagement.
Learning Timeline: This is an expert pose. With focused arm-balance training 2–3 times/week, expect several months to hold this alignment. Beginners should not rush it; even achieving partial lift on one side can take many weeks.
8. Scorpion Pose (Vrschikasana)
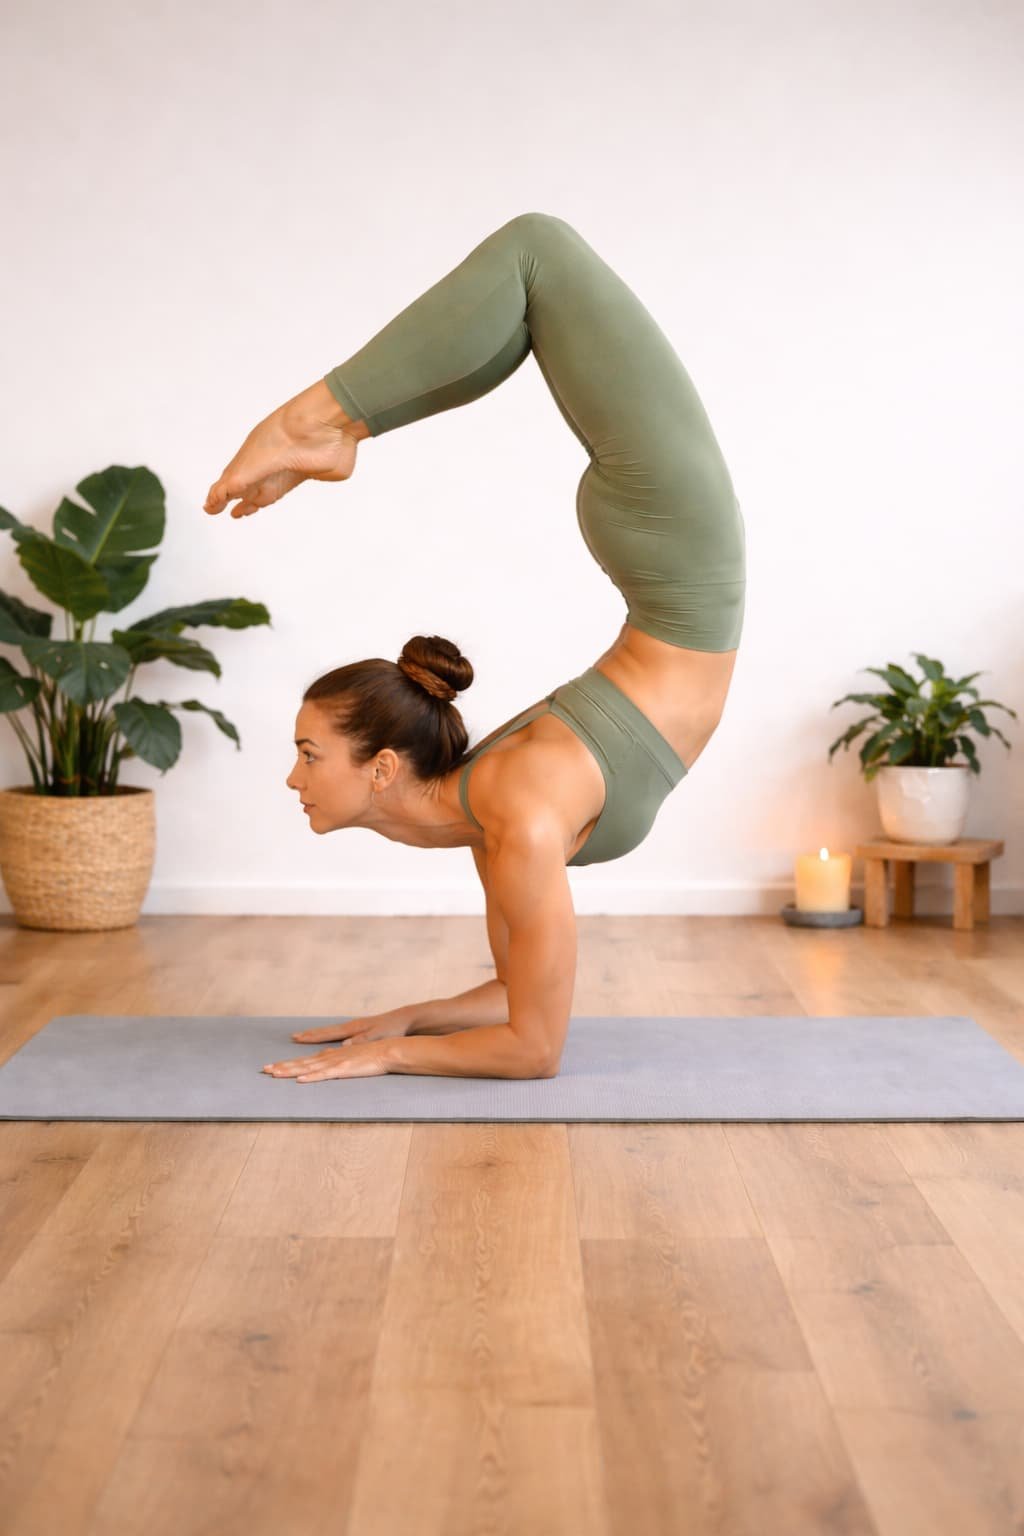
Description & Viral Appeal: Scorpion is a forearm stand backbend, where the feet aim toward the head. It’s visually striking – often seen in gymnastics and yoga trick videos. On social media, it’s a “wow” pose that garners likes for flexibility. Many influencers film attempts, making it a viral challenge for contortionists.
Steps: Begin in Dolphin or Pincha Mayurasana with forearms planted. Once stable, slowly bend both knees and let the feet drop toward the head. Keep thighs together and actively push the hips up while arching the spine. Aim to align knees with elbows and lift the chest. The key: shoulders remain pushed down, gaze forward on floor. Hold for a breath or two, then carefully straighten knees to exit, or arch one leg higher at a time.
Common Mistakes: Allowing hips to twist or legs to splay defeats the alignment. Many fall forward; control the descent by tucking chin and engaging core. Also avoid collapsing shoulders – they must stay over elbows. Scorpion should be a smooth arch, not a jerky drop.
Modifications: Use the wall for safety. Practice the same movement in a supported forearm stand facing the wall. You can also do “half scorpion” with one leg bent and the other extended to build side-to-side flexibility. Work up from a strong Pincha hold; if you’re not solid in the basic forearm stand, focus there first.
Contraindications: As a deep backbend and inversion, avoid with any spinal injury or neck problems. Also skip it if you have wrist/elbow injuries, heart issues, or high blood pressure. Follow the same precautions as forearm stand and wheel pose.
Learning Timeline: This extreme backbend can take many months or years. Even experienced yogis may spend years perfecting it. Beginners should not expect to achieve it quickly; instead focus on foundational forearm stands and increasing thoracic flexibility.
How to Do Advanced Yoga Poses: Plan and Safety
Coachella 2026 Guide: Lineup, Tickets, and Camping Details
6-Week Progressive Plan (Timeline)
Create a 6-week plan focusing on strength, flexibility, and balance. Each week has three training sessions (around 45–60 minutes) plus daily short routines. For example:
- Week 1: Build foundational strength (Plank, Push-ups, Crow Pose) and gentle flexibility (Down Dog, Low Lunge). Daily prep: hamstring stretches (like Supta Padangustha with strap) and shoulder openers (Dolphin). Milestone: hold Plank/Forearm Plank for 1 minute.
- Week 2: Add challenge poses briefly (attempt crow with one foot up), increase lunge depth (Half Hanumanasana hold 30s each side). Daily: core work (Boat Pose 30s). Milestone: lift one foot in Crow Pose.
- Week 3: Practice getting into Pincha Mayurasana using wall. Deepen splits and hip openers (Pigeon, Reclined Hand-to-Big-Toe). Milestone: kick up to wall-supported Forearm Stand.
- Week 4: Work on side balances (Twisted Crow prep, Bird of Paradise arms on wall). Continue splits and balance (half splits). Milestone: lean forward in one-legged arm-balance (Flying Splits prep).
- Week 5: Combine into practice: flow from Dolphin to Forearm Stand attempts, spinal strength (Bridge or Wheel prep). Safety note: ensure spotter or wall when trying inversions. Milestone: hold wall Forearm Stand 3–5 breaths.
- Week 6: Focus on form: each session pick a viral pose to try lightly (with modifications). Milestone: anyone who can safely lift leg in Reclined Toe Grab or step-up toward Pincha gets attention.
Warm-up, Cool-down, Injury Prevention
Warm-up (10–15 min): Always begin with light cardio (jog in place or sun salutations) and dynamic stretches. Include shoulder openers (arm circles, Cat-Cow), wrist warmers (gentle wrist rolls, prop palms on wall), and hip circles. For hamstrings, do gentle lunges and toe-touch bends. Gradually deepen with Sun Salutations and plank transitions so muscles are warm.
Cool-down: End with gentle stretches – Child’s Pose, Knees-to-Chest, Spinal twists (supine), and legs-up-the-wall for 5 minutes. This helps flush lactic acid and relaxes the back and neck after backbends.
Injury Prevention: Listen to your body. Never force a joint or push through sharp pain. Always engage core and align joints (knees tracking over ankles, elbows under shoulders). Keep neck long – don’t crunch it. When practicing inversions or backbends, use a spotter or wall until stable. For poses on hands (Crow, Side Crow), place a blanket or cushion under your face when learning. Regularly incorporate active rest (Walking, gentle Yoga) on non-training days.
Social Media Tips for a Viral Challenge
- Captions: Use humorous or motivating captions. For example, “Trying the viral yoga leg-hold challenge 🤸” or “Up for the challenge? Here goes nothing!” Phrases like “I can do it… I think” or “Me vs. my hamstrings” fit the comedic trend. Clearly invite friends to join by saying “Tag a friend to try this!”.
- Hashtags: Include popular tags like #YogaChallenge, #ViralYoga, #YogaChallenge2026, #YogaFails (for comedic posts) and specific pose tags (e.g. #SuptaPadangusthasana, #BirdOfParadisePose). Also seasonal tags like #SpringYoga or #SummerChallenge can help. Research trending audios on TikTok or Reels and use them; sometimes a trending sound makes the video more shareable.
- Filming Tips: Use good lighting and plain background. For step-by-step tutorials, film from an angle that shows full-body alignment (e.g. side angle for Reclined Toe Hold, front angle for Crow). If doing a challenge attempt, capturing facial expressions and the “fail moment” can make the video more engaging. Keep clips short (15–30s) and consider a quick montage of attempts. Encourage retakes or slowing down footage for dramatic effect.
- Accessibility: Always include caption text describing the movements (“sliding foot forward,” “lifting leg,” etc.) for those who are deaf or hard of hearing. On Instagram, use the alt-text feature to describe the image (“Person in side crow pose balancing on arms”). Ensuring captions (both in English and maybe one other language if accessible) helps widen reach. Tag reputable yoga pages or teachers if relevant (they may repost) but do so genuinely.
By following these tips and using the challenge format (e.g. “I challenge @friend”), your post can tap into the viral loop of tagging and sharing.
Tables and Charts
- Pose Comparison Table: (Below is a suggested table)
| Pose (Difficulty) | Strength Needed | Flexibility Needed | Risk Level |
|---|---|---|---|
| Supta Padangusthasana | Low (core) | High (hamstrings) | Low (caution hamstring) |
| Parsva Bakasana (Advanced) | High (arms, core) | Medium (hips) | Medium (wrists/elbows) |
| Svarga Dvijasana (Advanced) | Medium (core, legs) | High (hips, shoulders) | Medium (balance) |
| Mayurasana (Advanced) | High (arms, core) | Low (mostly arms) | High (wrist, elbow) |
| Pincha Mayurasana (Advanced) | High (shoulders, core) | Medium (shoulders) | High (balance, neck) |
| Hanumanasana | Low (legs) | High (hamstrings, hips) | Low (knee/hamstring) |
| Koundinyasana II (Adv) | High (arms, core) | High (hip flexors) | High (wrist, hips) |
| Vrschikasana (Advanced) | High (shoulders, core) | High (backbend) | Very High (neck, back) |